Tag Archives: recipes

Sour Cream Apple Muffins

Delicious treats

Delicious treats

I promised to make Rhys apple muffins for Father’s Day (it’s in September, here in Australia) but I missed it by a day because that Sunday was eaten up by errands. I made these on the same day as the Sour Cream Chocolate Cake so you see the unfrosted cake sitting in the background at in one of the photos.

applemuffin06 Continue reading

Pop Soda Sticky Chicken

sodachicken01

This chicken recipe uses a can of cola, orange soda, or Mountain Dew as a base. I’ve also used this as a recipe base for a slow cooker pork roast (adjusting the amount of ingredients to suit.)  This was a huge hit with the kids and adults alike.

Continue reading

Japanese Style Curry Bread


One of the things I like to eat here in Australia are meat pies. They fit in your hand, are a full meal in one, are served warm, and with a drink can be very satisfying. I’m also fond of pasties for the same reason. I mean, a food you can eat with one hand and a book or magazine in the other is tops for me.

Japanese Curry Bread is one of those delightful concepts where they took a good thing to an entirely new level. Instead of baking the stuffed bread, they dip it in egg, coat in panko bread crumbs and deep fry. Result: Crispy, savoury stuffed doughnut filled with comfort food. How could I not try this? I’ve technically eaten something like this in the Mini Stop shops back in the Philippines, but the dough left my mouth feeling dry; too much baking powder, perhaps? Nevertheless, they were filling, and cheap. But that’s all the way over across an ocean, and I’m in the Land Down Under. So, after my brother-in-law introduced me to a manga called Addicted to Curry, I resolved to make my own. I’m not as obsessive about curry as the folks in Addicted to Curry are, so I use the pre-packaged Japanese roux.

Continue reading

Easy Chocolate Cake

Easy Chocolate Cake

This is an adapted version of Marta Stewart’s 1 bowl chocolate cake

It’s not as heavy as mudcake, with a good ‘chewy’ mouthfeel, and despite the sugar, isn’t sweet tasting. Combined with the icing, which isn’t that sweet either it makes for a rich cake that makes you feel like you’re eating something decadent enough to slice thinly and enjoy with tea or coffee after dinner, or with friends in the afternoon. The recipe makes 1 8-inch double layer cake. The version pictured above was my successful test; when I made this for Rhys’ birthday, I tinted the frosting blue; one of his favourite colours.

Continue reading

Blender Sour-Cream Banana Bread

I’m lazy, so mashing bananas until they’re of a suitable consistency doesn’t appeal. However, I do love banana bread, and the kids don’t always get to eat all the bananas I buy for their lunch boxes. Blending the wet ingredients together also mixes them together more thoroughly. I like the use of soured milk or sour cream; it gives the banana bread a slight tang. If you don’t like it you can definitely substitute plain milk.

The picture above was taken only after half the loaf was eaten. Kinda forgot to take the photo; warm banana bread is irresistible. I bet these would make utterly delectable banana cupcakes.

Continue reading

Lumpia Shanghai

It’s been years since I made some; and none since I moved to Australia. So I made some. The meat mixture makes a good meatball too, but will need some breadcrumbs as binder. Consider the recipe below as a basic starter, and feel free to add other vegetables and seasonings and ingredients for your own lumpia.

I also put in how I wrap them, in case anyone needs a step by step. I hope it helps ^_^

Enjoy!

Continue reading

Oven Dried Adobo Flakes Maho

The most common and popular adobo recipe seen around tends to revolve around pork belly or leg chunks, or pork AND chicken. Traditionally, fatty chicken and fatty pork = adobo especially for travelling, because Filipino style adobo was a cooking method that resulted in a dish not too dissimilar to English potted hare – with the broth thickening to jelly and the fat sealing the top of the jar. In a country where the heat would result in spoiled food while travelling, adobo was king, and still is one of the ‘traditional’ dishes to take with you to the beach picnic.

Continue reading

Meringues

I’ve been doing a lot of running around on errands so I haven’t posted recently. My blood sugar dropped a lot so I found myself craving sweet things.

So I decided to take the plunge and made meringues for the first time.

Sounds silly I know, but I’ve had this thing about being afraid of screwing up the egg whites. I had a box of egg whites in my fridge that I bought and felt, if I never take the risk, I’ll never do it!

So I made this batch of brain food and boy, am I glad I did! (here’s a BBC Food’s recipe for meringue, it’s slightly different.)

Continue reading

Leche Flan

One of the easiest Filipino desserts for me to make here in Australia is Leche Flan. The kids love this recipe, but as you can see in the image, the caramel isn’t very dark. That’s because of my family’s preference, so you may need to experiment with the caramel to get it as dark as you like.

I hope you enjoy making this! This is a busy mom version; traditional Leche Flan  uses carefully separated egg yolks, careful hand beating with a whisk, and strains the mixture through cheesecloth several times, resulting in a silky creamy flan. I’m rather lazy and want my delicious treat with minimal effort; my answer to this is to tap the bubbles out and use either a blender or mixer.

Continue reading

Homemade Wontons


As part of their holiday ‘fun thing’ I taught my eldest how to make chicken wonton filling / chicken meatballs. Eldest boy helped wrap up a few, but I had to take over or else we wouldn’t have dinner on time! Happily my little budding hearth witch mastered the wrapping of wontons quickly. We still have meat so we’ll make a packet of wontons to freeze, and make meatballs out of the rest.

Continue reading

I keep doin’ this to myself

Elven Fried Bread


So, I spent a rather insomniac night craving doughnuts, so I bounced around the Internet, gazing hungrily at doughnut recipes, because I’ve never made doughnuts before.

Well, okay I was also looking up ideas for making black forest truffle balls, because I am seriously, seriously missing me some Red Ribbon Black Forest Cake. ;_; (The last one I had, ever, was thanks to Ford Prefect42 and Akilika! Thank you~! I treasure the memory . )

So thanks to that, I ended up on a blog called Let The Baking Begin! Aaaaaaaaand in the manner that one usually ends up Trapped In TVTropes, by the time I resurfaced, it was 5 am in the morning.

Thanks to that I have a nice recipe for latkes that I want to try sometime. And a recipe for home-made soft cheese.

I am casting the puppy eyes at Rhys to help me make these doughnuts. And possibly fried elven bread – a more savory, salty, as addictive as popcorn bread that I make.

I probably should explain that one a bit more.

When I was a teen/early twenties I was able to get my hands on the Leaves from the Inn of the Last Home Dragonlance sourcebook. To my delight, they had recipes, and one of the recipes was for a travelling fried flat bread sometimes referred to as elven bread because the Kagonesti made the things. Being simple it was one of the first things I made out of the book. Yes, I didn’t make Otik’s Fried Potatoes; I wasn’t very good with spices at the time. Shocking, I know.

(Mutters: I haven’t seen the book since we last moved house. grumbles!)

Baked it was a bit dense and got hard very quickly (we guessed it may have to do with the flour) but my mom and I decided to try the fried version, which is the one favoured by ‘adventurers and wilder elves’, hence the resulting name.

It was good. We ended up with a chewy, addictive bread, but still lacking something.

Flour was cheap. So was oil. Over the next while, we made batches of the fried bread, tweaking and adjusting. My brothers were happy to eat the experiments anyway and we hadn’t had any problems with the amount we made.

I found the notebook I wrote the resulting recipe in (It’s got oil splatter on it, hahaha) so I’m sharing it now. It’s a deep fried, salty, chewy bread, that we make into small balls and eat like popcorn while watching movies or reading books.


Elven Fried Bread, inspired from the Dragonlance recipe

Ingredients

2 cup water

4 cups flour

1 tablespoon salt

1/2 tablespoon sugar

1 tablespoon yeast (I use a granulated yeast) / 1 packet yeast

1/4c (plus more for your hands) olive oil (I tend to use extra virgin olive oil)

Mix 1 cup water, at body-temperature warmth (what I call ‘blood-warm’, since it’s actually warmer than body temperature and hotter than lukewarm) with sugar, and dissolve. Add the yeast and let it grow in the water.

Dissolve the salt in the other cup of water. In a bowl, sift the flour and make a well.

When the yeast has bubbled, pour into the flour and mix to make into a sticky dough. Add about a handful of olive oil and mix it in – this helps make the dough flexible and chewy, as well as adds flavour, and has the side benefit of helping keep the bread from sticking too much to the bowl. You’ll end up with a very sticky, stretchy dough. If you want to knead it you may, but I tend not to.

Cover with a damp cloth and set in a warm place to rise for 1-2 hours.

Heat enough cooking oil for deep frying.

Oil hands and pinch off enough bread dough to make a 2-3 cm wide flat circles and slide into the hot oil. Or balls the size of quarters / 20 Australian cent pieces. Fry on both sides till golden brown, drain in a colander with a paper towel on the bottom. Best while hot.


The original version sounds a lot like American Fried Dough.

Now if y’all will excuse me I’m gonna make a batch of this stuff, because writing it up made me hungry hungry hungry.


Save

Chocolate de Tony Modena


This recipe is named after my father, who would make this chocolate on cold autumn and winter nights when we lived in Europe. It is best had while still hot, with bread to dip into it (like brioche, or pan de sal), or excellent with Churros if you know how to make those (‘coz I’m afraid I don’t… yet. As of this writing anyway.)

You may substitute the sugar and butter with the sugar substitute of your choice, and butter-flavoured margarine. I’ve been told by friends that the use of these does not in any way or form detract from the fullness of chocolatey flavour. I am unsure how this would taste if one uses a cow milk substitutes, as the cream of the milk is part of what gives this the rich flavour. Do feel free to experiment and let me know how it goes!

I should warn that this is very addictive stuff, and utterly wonderful comforting delight while reading a book

Ingredients

3/4 cup cocoa powder / Dutch cocoa powder (unsweetened)

3/4 cup (packed) brown sugar

2 1/2 cup evaporated milk OR full cream milk (must be full cream)

125g butter (or 1/2 cup butter) or half a 250g cake of butter

2 teaspoons instant coffee powder (I use Nescafe Blend 43 or 45; or Arabica… but feel free to omit, or substitute a preferred brand This helps enhance the flavour of chocolate and gives it a dark richness and depth.)

1) Cream the butter, sugar and cocoa powder together in a saucepan, the way you would if you were making cookies. If you are using coffee powder, you may add coffee at this point. If using granules I prefer to put it on the next step.

Butter chopped into cubes ready for mixing into a chocolate powder mixture

Chopped butter is easier to mix.

Mixing tablea powder mixture with butter, best done with a food processor

Use a food processor; it’s easier! I only found this out afterward.

Tablea chocolate mixture being finished off by hand mixing

Then you won’t have to do this.


1.b) You have the option of turning this to chocolate tablea, by taking the mixture, rolling it into 1 inch size balls and refrigerating till solid. If making this for tablea, it’s best to use a glass or ceramic bowl. Each 1 inch ball will correspond to roughly 1 mug size serving.

Shaping chocolate mixture into tablea balls

Roll into balls roughly 1-inch in size

Balls of chocolate tablea ready for chilling

Cool the balls in the fridge for about 30 min to an hour

Balls of tablea chocolate in glass jars

Put into jars or a plastic container and keep in fridge

2) When it is well blended, add milk and simmer at medium heat, mixing constantly. When it reaches a boil, lower the heat, add coffee powder and keep stirring till chocolate is of the thickness you wish it to be.

2.b) If having made tablea, pour 1/2 cup milk or cream into a small saucepan and add tablea. Stir as the milk heats to melt the tablea. Prepare as above, diluting with milk until it reaches the thickness you want.

Ball of tablea chocolate being added to a mug of hot milk

Add 1 ball to about 1/2 cup hot milk

Tablea chocolate being stirred into hot milk

Mix the tablea into the milk until fully dissolved

Mug of hot chocolate ready to drink

Drink your hot chocolate!

Serve at half-mug servings with toast for dipping, or add warm milk for drinking at each cup. Sinfully good. Makes roughly 4 mugs of undiluted chocolate. Chocolate may be reheated in microwave.

Notes:

  • Here where I live in the Philippines they sell butter in a brick cake that is equal to 1 cup butter / 250g of butter. Some brands go only up to 225g, but the one I use is 250g. I used salted butter. The butter takes place of the butter in melting chocolate if using melting / baking unsweetened chocolate or chips.

**I added the coffee powder so the chocolate tastes extra dark when dipped, out of preference. Taste the chocolate before adding coffee powder so you can adjust for preference in flavour.

Merry Christmas and Happy Holidays!

Chicken and Pork Adobo Modena Family Style v2

I get requests to share my family’s adobo recipe fairly often, so I figure this is easy to drop in.

This dish can take up to two days of advance preparation, but only if resulting in the crispy Adobo version at the very end – something that doesn’t happen very often in my household because by the time the adobo is finished cooking and falling apart tender, everyone’s starving, Rhys comes home to delicious cooking smells and everyone wants to EAT IT NOW.

If making this for dinner, I start at about 10 AM and leave it simmering on the stovetop for the whole day on the lowest fire possible. At about an hour before dinner, that’s when I remove the chicken bones and gristle, and add the soy sauce and final seasonings. The long cook time results in incredibly flavourful and tender meat. Rice is cooked about half an hour before dinnertime.
This recipe can result in two different types of adobo: the usual Adobo stew, or Crispy Adobo Flakes.

Stew-consistency adobo, when cooled, has the sauce turn into a jelly. This makes it ideal for taking along on school lunches to be eaten even unheated with rice or bread, on road trips and picnics, as the vinegar and salt content of the dish helps preserve the meat against spoilage, even in the hot tropical Philippine climates. Adobo-style cooking of meat has been traditionally one of the favoured methods of preparing ‘travelling food’, especially when the only way to get around was via water buffallo or oxen pulled cart. The versions for such old-style travelling tended to be heavier on the cracked peppercorns and had a higher amount of fat and bone to result in more of the preserving jelly, and the meat was not cooked to falling-apart softness, but cooked through and left on the bone for ease of serving and eating while on the road.

Cooling the adobo to remove the extra fat can be done if desired, but I feel some fat should be allowed to remain for flavour.

If you wish, you can also use stewing cuts of beef – either in substitution for pork or in addition to the meats already listed.
Ingredients:
At least 1kg each of:
Pork meat, cut into cubes. Some fat is recommended, but if you have only lean cuts of meat, go with adding chicken with skin on. You can skim the fat off later if it’s for a dinner and not a picnic. (See above note about resulting travelling/picnic adobo) Additional note: you are very likely to get a lot of rendered oil from the fat.

Chicken with skin and bone (thighs or drumsticks are good. Make sure feathers are fully removed from skin!)

For every kg of meat 1 cup each of
Marca Pina, Maggi, Knorr or Silver Swan brand soy sauce
Marca Pina or Datu Puti brand brown cane vinegar
(The brand is important, as this results in the flavor sought. Do not substitute Kikoman or other soy sauces, as the flavor of Kikoman is very different from the soy sauces named above! The brands named should be available in either Asian or Filipino food stores.)

For every kilo of meat: At least 1 head, or 1 and a half head of garlic, peeled, crushed and chopped. If using pre-chopped garlic, slightly heaping 1 teaspoon (the one you use in stirring your coffee or tea, not the measurement.) (Try to do it this way the first time. Substituting garlic paste or dried garlic powder can be done in future cooking.) The more garlic in adobo, the better.

Cracked pepper and salt to taste.

Optional additions:
a) 1-2 bay leaves, added during simmering stage and removed before serving
b) Chili peppers
Long white mild chili peppers; 1-3 per batch of adobo (usually whole)
Red or Green long chili peppers, as spicy as desired, whole or chopped
3-8 birds eye chilies, either whole or chopped. Or any other chili of choice.
Chilies are added after seasoning with soy sauce, salt and pepper.
c) Potatoes, peeled and chopped into quarters or eighths. Add just after seasoning with soy sauce, salt and pepper to taste.
d) Del Monte or Dole canned pineapples, either chunks or as slices (Brand is again, important, to achieve the sought-after flavour, as these brands are sweeter than Sun Gold or Gouburn / Australian brand pineapples.) Add 10 minutes before serving.

Method:
1) Boil chicken in just enough water to cover the chicken meat, adding the necessary amount of vinegar and garlic until the meat has just cooked, but is not yet soft.

2) Add the pork with its’ share of vinegar and garlic, adding more water to just cover the meat again. Season with some pepper and about a tablespoon of salt.  (Adding the pork later after the chicken is so that the chicken fat in the water helps soften and flavor the pork; an especially important step if using lean cuts of pork. if the cut of pork has some fat, simply put it all in the pot together, merging the steps.)

3) Simmer on low heat and allow the broth to boil down, then add enough water again to just cover, stir the pot. Cover the pot, and allow to boil down again. Keep doing this until the meat is falling-apart tender, and the broth/sauce is yellowish in hue. If you wish to remove the chicken bones and gristle from the adobo, this would be a good time to do it.

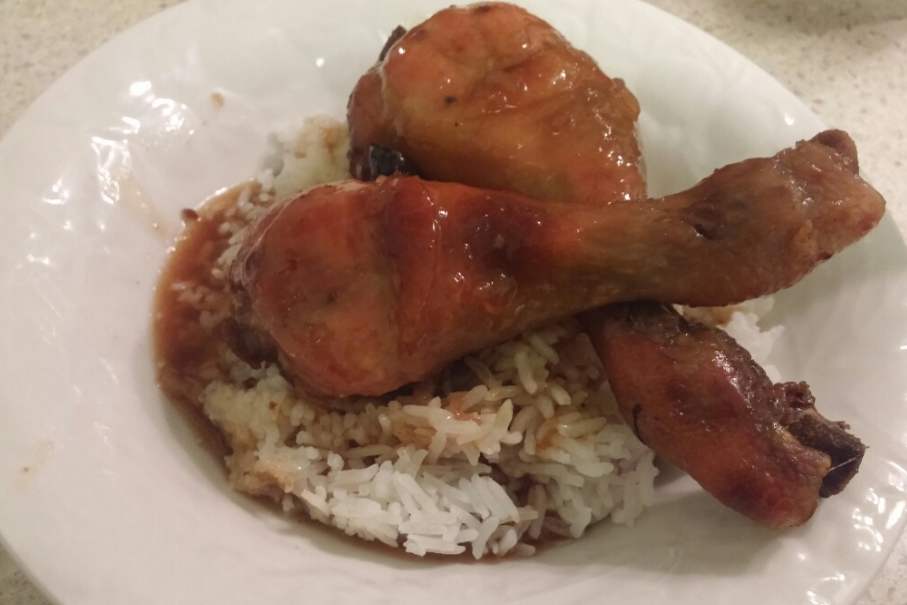
4) Add the required amount of soy sauce. Season the adobo with salt and pepper as desired (you can also add chopped bird’s eye chilies at this point, if you want a spicy adobo.)  Adding the soy sauce too soon makes the meat tough, we’ve found, so that’s why we cook it in vinegar-water-garlic/onion and pepper first. Reduce the liquid to sauce or stew consistency.

At this point, you may serve the meat over hot white rice,

or

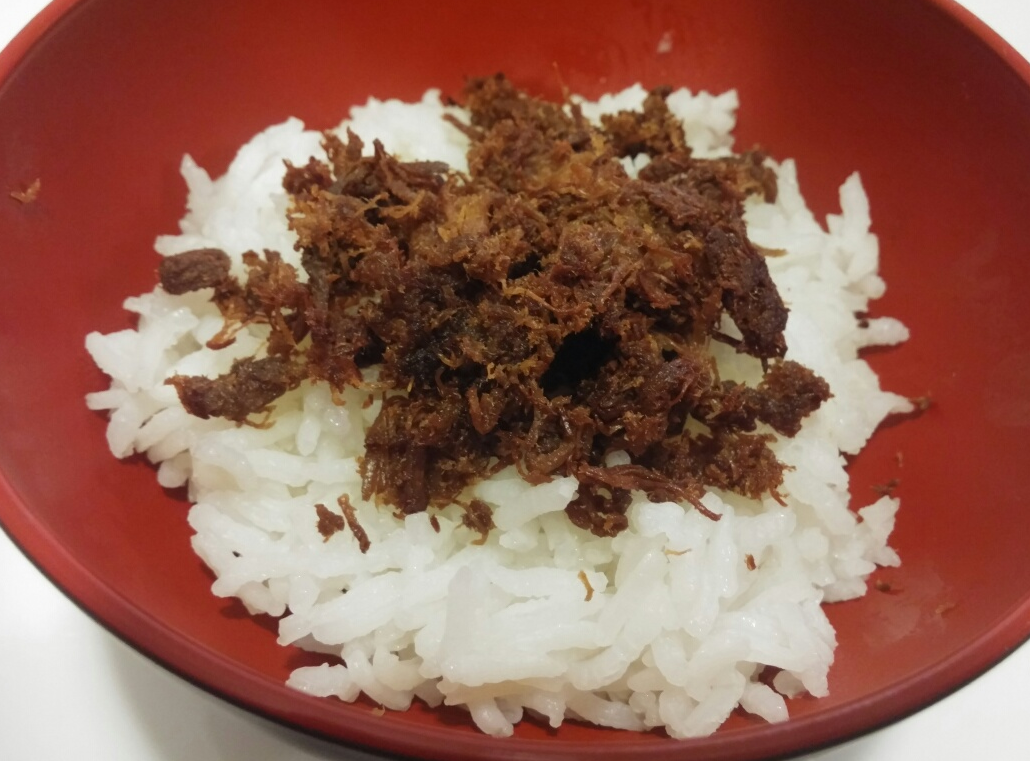
allow the sauce to boil away so that you can shred the meat into strips and fry the meat in its’ own oils and juices for Crispy Adobo Flakes.

Fry shredded adobo meat in batches until crispy before eating with rice. The cripsy version is also popular in the Philippines as a beer-side dish, like peanuts and chips.

Crispy Adobo can also be stored and refrigerated for box lunches.